Manually configure Point-To-Site VPN

If you want to connect to the VPN manually, do as following:

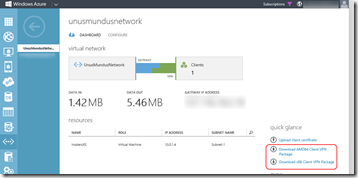
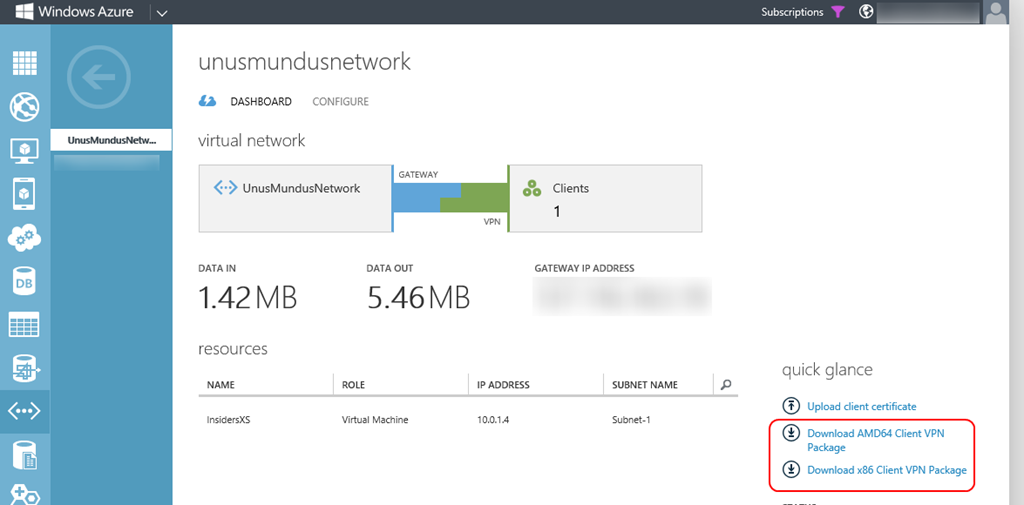
1. Download client  VPN package from management portal site
image

2. Unpack to VPN package file.

You unpack a VPN package file as follows:

vpnpackage.exe /C /T:c:\temp\vpnpackage

3. Install *.cer file for VPN gateway in unpack folder

You should install as an administrator a *.cer file as follows:

certutil -addstore root vpngateway.cer

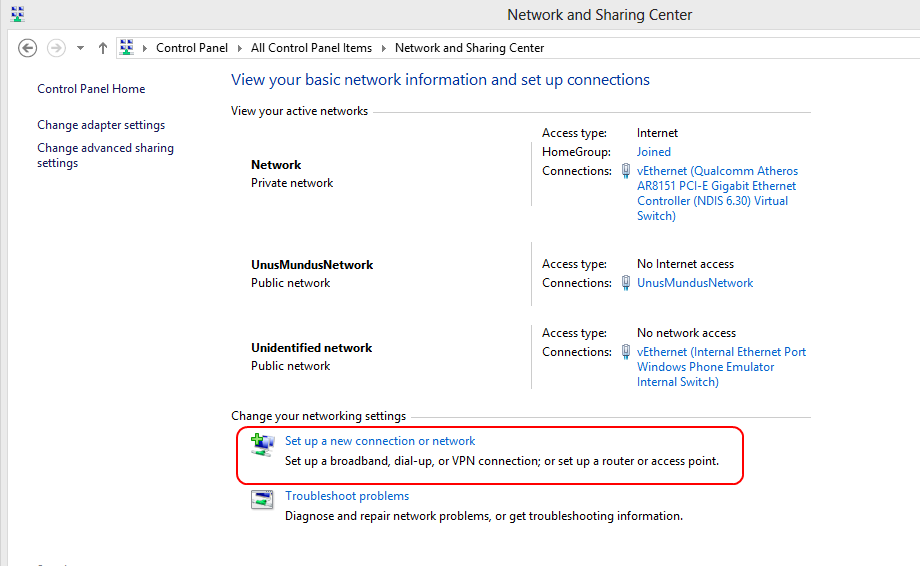
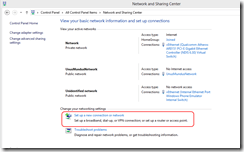
4. Set up a new VPN connection
image

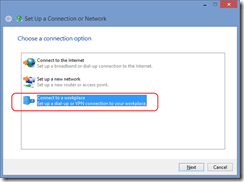
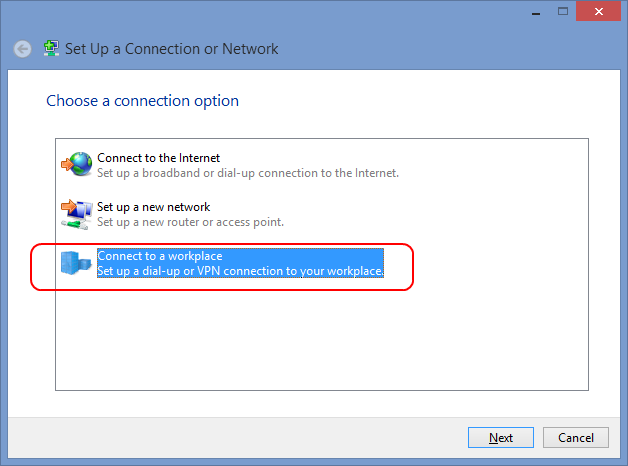
Select a [Connect to a workplace].

image

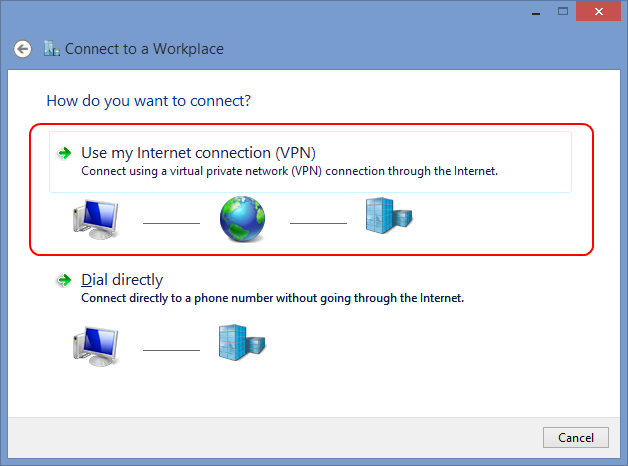
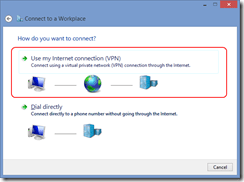
Select a [Use my Internet connection (VPN)].
image

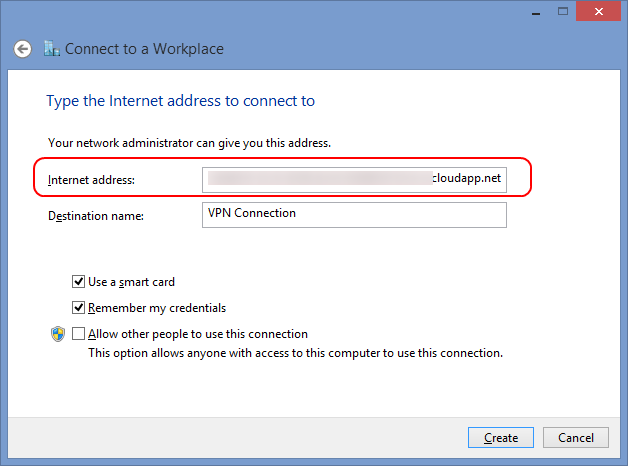
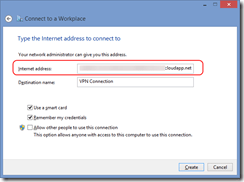
Enter a Azure VPN gateway FQDN in [Internet address].
image

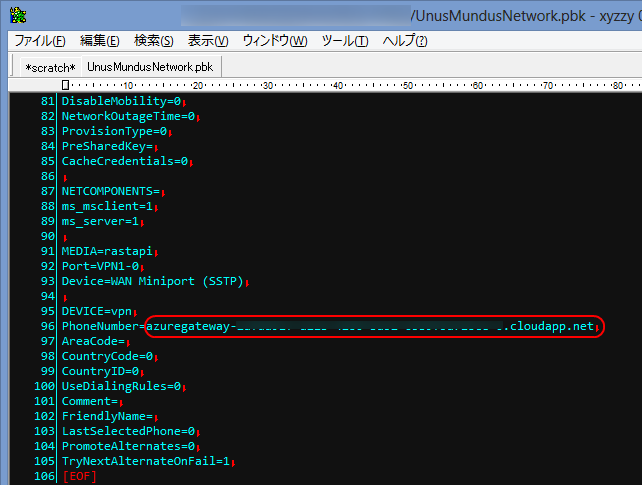
* Your’s VPN gateway FQDN has been described in the pbk file.
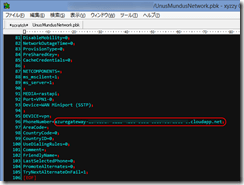
image


5. Change the property in VPN connection

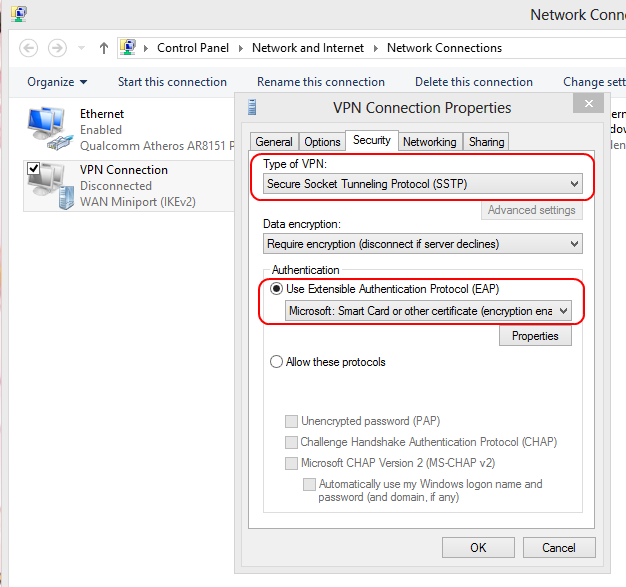
in Security Tab
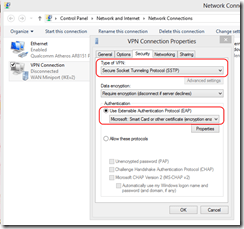
image

  • [Type of VPN] … [Secure Socket Tunneling Protocol (SSTP)]
  • [ Use Extensible Authentication Protocol (EAP)] … [Microsoft: Smart Card or other certificate (encryption enable)]

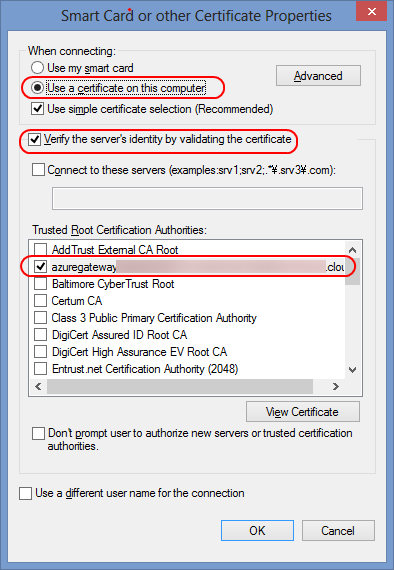
in EAP property
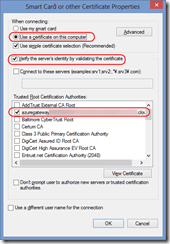
image

[When connection:] … [Use a certificate on this computer]

  • [Verify the server’s identity by validating the certificate] … checed
  • [Trusted Root Certification Authorities] … Checked a your’s VPN gateway certificate.


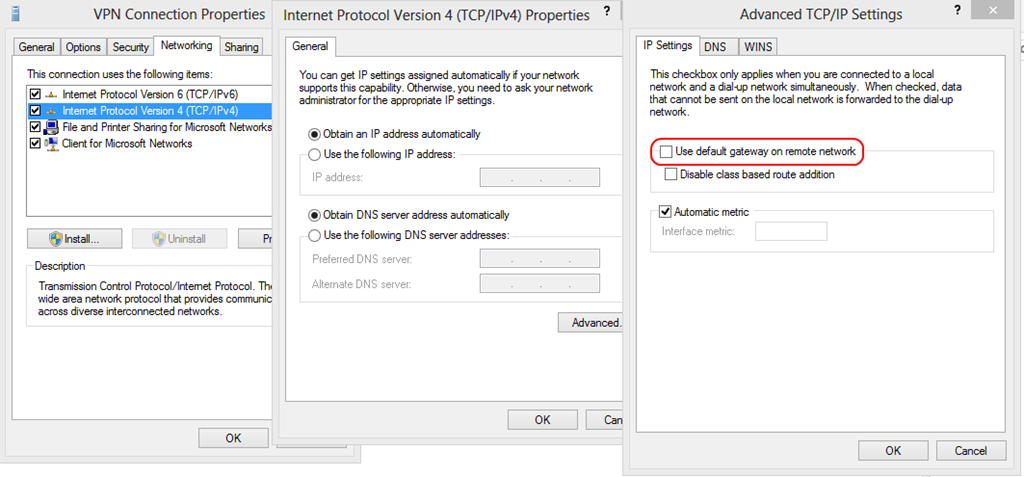
You should turn off [Use default gateway on remote network] option in Networking tab.
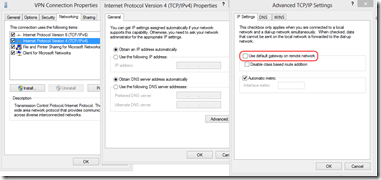
image

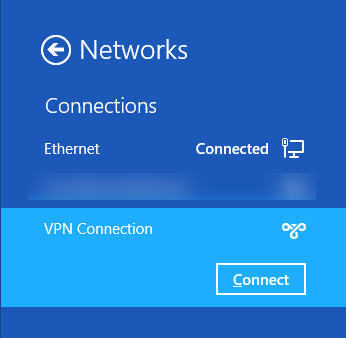
6. Connect to VPN

image

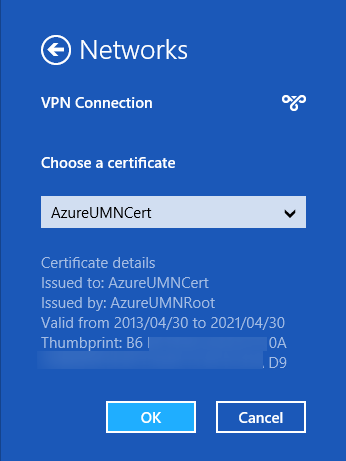
You should choose a client certificate for Azure VPN gateway at start connect.
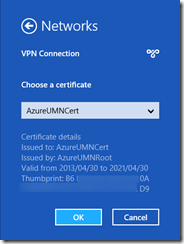
image

If error not occurred, congratulation! You can connect to Azure Virtual Network over VPN!
WIndows Azure 仮想ネットワークの更新&Ruby SDK

今日はAzure Global Bootcamp当日だというのに、われらがScottGuはやってくれました。Updateです。

今日のUpdateはこちら。

  • 仮想ネットワーク
  • 新しいPoint-To-Site接続(非常にクール!) ※Preview
  • ソフトウェアVPNデバイスサポート
  • DNS設定変更のサポート
  • 仮想マシン
    • リモートPowerShellとLinux SSH プロビジョニング強化
  • クラウドサービス
    • Web/Workerロールの動的リモートデスクトップ
  • Windows Azure SDK for Ruby
  • 続きを読む →

    Windows Azure VM Role 終了のお知らせ

    諸君らが愛してくれたVM Roleは死んだ、何故だ! Windows Azure Infrastructure Services(仮想マシン・仮想ネットワーク)がGAしたからだ!

    ということで仮想マシン正式リリースということで、長年Windows Geekたちを楽しませてくれたVM Roleは2013年5月15日をもって終了となりました。

    5月15日をもって新規VM Roleの展開ができなくなり、5月31日に実行中のVM Roleは削除されます。なので早めに仮想マシンのほうに移行しておきましょう。

    VM Roleから仮想マシンへの移行はVHDを流用すればさほど難しくないはずです。

    というわけでVM Roleさんありがとうございました。

    Windows Azure 仮想マシン/仮想ネットワークが正式リリース

    かれこれ1年ぐらい待ったわけですが、2013年4月16日にめでたくWindows Azure 仮想マシンと仮想ネットワークがGAされました。

    やったね!

    GAに伴うもろもろの内容は以下の通りです。

    • サービス名称の変更
    • ハイメモリインスタンス
    • SQL Server 2012とBizTalk Server 2013
    • SLAと24×7 サポートプランの提供
    • 料金の変更
    • VM Depotとの連携

    簡単に見ていきましょう。

    続きを読む →

    Windows Azure AD/Backup Serviceほかいろいろ

    Updateは唐突に。

    というわけでWindows AzureがUpdateされました。

    内容は主に3点+α

    • Windows Azure Active DirectoryがGA
    • Windows Azure Backup (Preview)
    • Windows Azure Web Sites Monitoring & Diagnostics
    • その他Update
    • HDInsigh
    • Operation Logs
    • Media Services
    • Virtual Machines

    続きを読む →

    PredefinedAdornmentLayers の説明が不十分

    だいぶ前にVisual Studioの拡張機能でエディタ部分をいじりましたが、その時にどのレイヤに拡張部分を差し込むのかちゃんと説明できてませんでした。

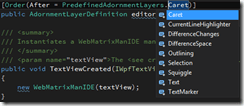
    具体的にいうと AdornmentLayerDefinition の Order属性のAfterとBeforeで指定する値ですね。

    ここで指定する値は PredefinedAdornmentLayers になるんですが、どのレイヤがどういう順番なのかさっぱりわかりませんね。

    ※以前は説明文すらなかったけど、今はドキュメント更新されてますね。よかったよかった。

    というわけで、MSのサポートさんから情報をもらったのでここで公開しておきます。

    名前 説明 順番(Z-Order)
    Caret テキストのキャレットを描画してるレイヤ 最前面
    Text エディタのコンテンツ(テキスト)を描画してるレイヤ 7
    Squiggle 構文エラーとかで表示される波線とかを描画してるレイヤ 6
    Selection IME入力時の選択領域を描画してるレイヤ 5
    TextMarker ITextMarkerProviderFactoryで提供してるテキストマーカーを描画してるレイヤ 4
    CurrentLineHighlighter 現在行のハイライトを表示しているレイヤ(キャレットがある行) 3
    Outlining 折り畳みヒントを描画してるレイヤ 2
    DifferenceSpace IDifferenceViewerで提供されるブロックの位置合わせ表記などを表示するレイヤ(差分ビューアなどで見るやつ) 1
    DifferenceChanges IDifferenceViewerで提供されるコード差異や線などを表示するレイヤ(差分ビューアなどで見るやつ) 最背面

    ※Outliningだけ特殊みたいでCurrentLineHighlighterからDifferenceChangesの間の任意のレイヤに差し込まれるみたいです。

    ちなみにAfterとBeforeに矛盾した設定(例:Before=Squiggle, After=Textなど)をした場合、無条件に最前面になるので注意。

    最後に、Microsoftサポートのみなさんありがとうございました。

    噂のアレをアレする

    ムッシュから素材を頂いたので。

    1. いろいろ頑張って作ったPowerPointをPDFにエクスポートする

    2. Inkscape でPDFを読み込む

    3. オブジェクトを選択して名前を付けて保存→ Microsoft XAML(.xaml)形式で保存する

    4. そのままだと使えないのでエディタで整形する

    なんとなくPathGeometryをPathにして、Figures属性をDataに、FillRule属性は削除

    Path.Data要素の子要素になってる場合はPath.Data要素ごと消して親のPath要素にまとめる

    <Path xmlns:x="http://schemas.microsoft.com/winfx/2006/xaml" Name="path3772" StrokeThickness="3" Stroke="#FF000000" StrokeMiterLimit="10" StrokeLineJoin="Miter" StrokeStartLineCap="Round" StrokeEndLineCap="Round">
    <Path.Data>
    <PathGeometry Figures="m 503.7 398.82 c 5.68 -0.15 22.9 -16.33 32.04 -25.95 9.14 -9.62 19.28 -26.01 22.8 -31.77" FillRule="NonZero"/>
    </Path.Data>
    </Path>
    

    ↓

    <Path xmlns:x="http://schemas.microsoft.com/winfx/2006/xaml" Name="path3772" StrokeThickness="3" Stroke="#FF000000" StrokeMiterLimit="10" StrokeLineJoin="Miter" StrokeStartLineCap="Round" StrokeEndLineCap="Round" Data="m 503.7 398.82 c 5.68 -0.15 22.9 -16.33 32.04 -25.95 9.14 -9.62 19.28 -26.01 22.8 -31.77" />


    ※マクロとかいろいろ駆使しましょう。

    という感じでWindows Store Appとかで使えるPathになりました。

    image

    ※デザイナでみるとおかしいです。。

    image

    実行するとこんな感じ。Pathなのであとはお好きなようにですね!

    同じコードでWPFもWPもいけます。

    Blendなくても頑張れます。イラレとか持ってなくてもPowerPointとInkscapeでなんとかなるw