Windows Azure SDK 1.3 の機能であるFull IISを利用してWeb Roleを展開すると、Web.configに明示的に指定してたMachineKeyが Windows Azure上に配置後上書きされる問題があります。(※Hosted Web Coreを利用する場合は問題ないようです)
この問題に対する回避策はSteve Marxが回答していますが、MSDNのIssueにあるようにRoleEnvironmentのOnStart等で明示的に書き換えてあげる必要があるようです。
MachineKeyが固定化できないと、複数インスタンスで展開した場合にフォーム認証がうまく動作しない等、いろいろ問題ありますね。
でも毎回こんな定型コードも書いてられねーってわけです。
ということで、面倒くさいことはPluginで簡略化しちゃおうというのが今回の趣旨。
Windows Azure SDK 1.3では診断モニタやリモートデスクトップ等、いくつかのプラグインが標準で提供されていますが、ちょっとした書式にのっとって書いてあげれば独自のプラグインも利用できるようになっています。
作り方
作り方等詳細は@StatemachineさんのBlogを参照ください。
MachineKeyの生成はこちらのサイト等が良いかと思います。(@shibayanさんに教えて頂きました)
やってることは単純です。Roleが起動するのを待ってWeb.configに明示的にMachineKeyを指定しているだけです。※App.configで混在アセンブリを許可しています。
/// See also: User-Specified Machine Keys Overwritten by Site-Level Auto Configuration
/// http://msdn.microsoft.com/en-us/library/gg494983.aspx

using System;
using System.Collections.Generic;
using System.Linq;
using System.Text;
using Microsoft.WindowsAzure;
using Microsoft.WindowsAzure.ServiceRuntime;
using Microsoft.Web.Administration;
using System.Diagnostics;

namespace CustomPlugin
{
	class Program
	{
		static void Main(string[] args)
		{
			SetMachineKey();

		}

		static public void SetMachineKey()
		{
			DefaultTraceListener drl;
			drl = (DefaultTraceListener)Trace.Listeners["Default"];
			drl.LogFileName = "MachineKeySetter.log";

			Trace.WriteLine(string.Format("{0}\t{1}",DateTime.Now.ToString(),"Start"));
			while (true)
			{
				try
				{
					if (!RoleEnvironment.IsAvailable)
					{
						Trace.WriteLine(string.Format("{0}\t{1}", DateTime.Now.ToString(), "RoleEnvironment.IsAvailable is false."));
						System.Threading.Thread.Sleep(30000);
						continue;
					}
					int WaitInterval = int.Parse(RoleEnvironment.GetConfigurationSettingValue("CustomPlugin.MachineKeySetter.WaitInterval"));
					string validationKey = RoleEnvironment.GetConfigurationSettingValue("CustomPlugin.MachineKeySetter.validationKey");
					string decryptionKey = RoleEnvironment.GetConfigurationSettingValue("CustomPlugin.MachineKeySetter.decryptionKey");
					string validation = RoleEnvironment.GetConfigurationSettingValue("CustomPlugin.MachineKeySetter.validation");
					string decryption = RoleEnvironment.GetConfigurationSettingValue("CustomPlugin.MachineKeySetter.decryption");
					string TargetWebServiceModel = RoleEnvironment.GetConfigurationSettingValue("CustomPlugin.MachineKeySetter.TargetWebServiceModel");

					using (var server = new ServerManager())
					{
						var siteName = string.Format("{0}_{1}", RoleEnvironment.CurrentRoleInstance.Id, TargetWebServiceModel);
						var site = server.Sites[siteName];
						if (site == null)
						{
							Trace.WriteLine(string.Format("{0}\t{1}", DateTime.Now.ToString(), "IIS Virtual site does not configure."));
							System.Threading.Thread.Sleep(WaitInterval);
							continue;
						}
						var siteConfig = site.GetWebConfiguration();

						var machineKeySection = siteConfig.GetSection("system.web/machineKey");

						if (validationKey == machineKeySection.GetAttribute("validationKey").Value.ToString())
						{
							Trace.WriteLine(string.Format("{0}\t{1}",DateTime.Now.ToString(),"Complete."));
							return;
						}

						machineKeySection.SetAttributeValue("validationKey", validationKey);
						machineKeySection.SetAttributeValue("validation", validation);
						machineKeySection.SetAttributeValue("decryptionKey", decryptionKey);
						machineKeySection.SetAttributeValue("decryption", decryption);

						server.CommitChanges();

						Trace.WriteLine(string.Format("{0}\t{1}{2}",DateTime.Now.ToString(),"validationKey:",machineKeySection.GetAttribute("validationKey").ToString()));
					}
				}
				catch (Exception ex)
				{
					Trace.WriteLine(string.Format("{0}\t{1}{2}", DateTime.Now.ToString(), "Exception:",ex.ToString()));
					System.Threading.Thread.Sleep(30000);
					continue;
				}
			}
		}
	}
}
作成後、必要なアセンブリと一緒に C:\Program Files\Windows Azure SDK\v1.3\bin\plugins フォルダ以下に MachineKeySetter フォルダを作成し、アセンブリ一式を置きます。
その後、拡張子が.cspluginなMachineKeySetter.cspluginファイルを作成し、以下のように記述します。
<?xml version="1.0" ?>
<RoleModule
  xmlns="http://schemas.microsoft.com/ServiceHosting/2008/10/ServiceDefinition"
  namespace="CustomPlugin.MachineKeySetter">
  <Startup>
    <Task commandLine="MachineKeySetter.exe" executionContext="elevated" taskType="background" />
  </Startup>
  <ConfigurationSettings>
    <Setting name="WaitInterval" />
    <Setting name="validationKey" />
    <Setting name="decryptionKey" />
    <Setting name="validation" />
    <Setting name="decryption" />
    <Setting name="TargetWebServiceModel" />
  </ConfigurationSettings>
  <Endpoints>
  </Endpoints>
  <Certificates>
  </Certificates>
</RoleModule>
以上。あとは実際にWebRoleプロジェクト等で利用するだけです。
使い方
.csdef にプラグインをインポートするように Import要素を追加します。
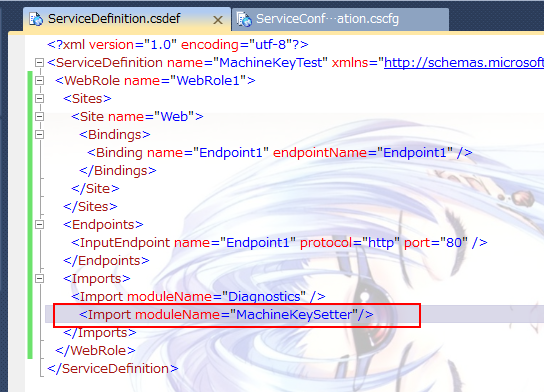
プラグインをインポートすると、 .cspluginに記載した設定が .cscfgに自動的に追記されますので、必要な値を入れていきます。
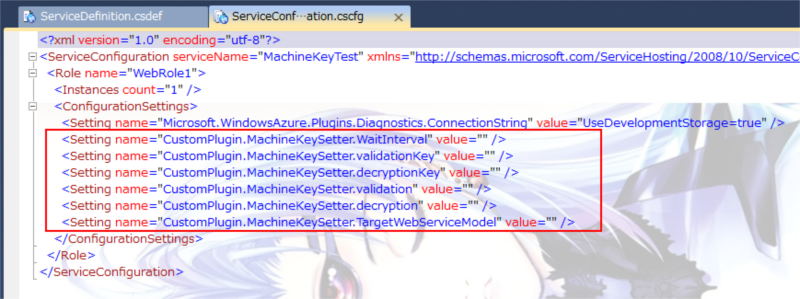
WaitInterval はWeb.configの書き換えをするタイミングを調整するもので、msで指定します。RoleEnvironment.IsAvailable を見るのと、Web.config のMachineKeyが指定したものに書き換わっていない場合、ここで指定したインターバル分Sleepします。
validationKey 、 validation 、 decryptionKey 、decryption はWeb.configのMachineKey要素そのままです。
TargetWebServiceModel は .csdef で定義している、Web.configを書き換えたい Site要素の名称を指定します。(既定だと Web ですね)
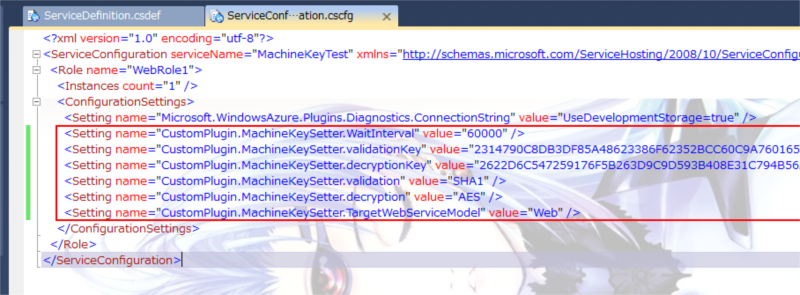
設定例:
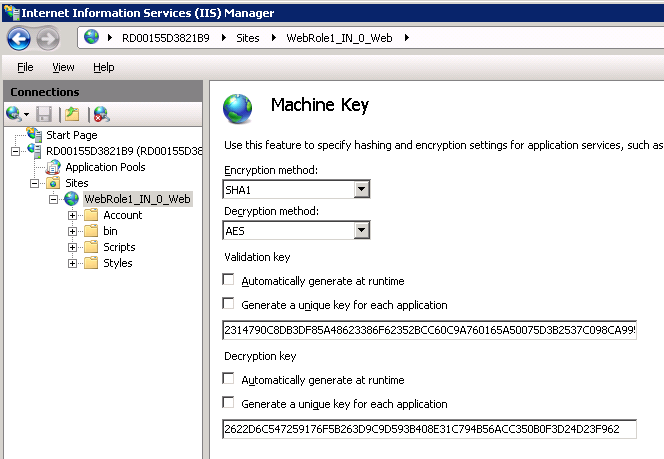
実行結果
実際に配置してみるとうまくWeb.configのMachineKeyが書き換わってることがわかります。
※とまぁいろいろ書きましたが起動のタイミングが怪しいのでSleepばっかりだし、素直にOnStartで書いたほうが楽かもしれませんね。
ソース等
ソース/バイナリはCodePlexにUpしていますのでご自由にどうぞ。
免責として自己責任でお願いします。何かあっても知りません。
